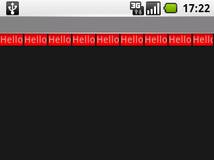
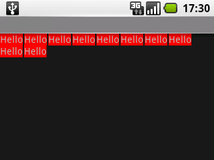
我制作了自己的布局,可以做我想要的,但目前它非常有限。当然,欢迎提出意见和改进建议。
活动:
package se.fnord.xmms2.predicate;

import se.fnord.android.layout.PredicateLayout;
import android.app.Activity;
import android.graphics.Color;
import android.os.Bundle;
import android.widget.TextView;

public class Predicate extends Activity {
    /** Called when the activity is first created. */
    @Override
    public void onCreate(Bundle savedInstanceState) {
        super.onCreate(savedInstanceState);

        PredicateLayout l = new PredicateLayout(this);
        for (int i = 0; i < 10; i++) {
            TextView t = new TextView(this);
            t.setText("Hello");
            t.setBackgroundColor(Color.RED);
            t.setSingleLine(true);
            l.addView(t, new PredicateLayout.LayoutParams(2, 0));
        }

        setContentView(l);
    }
}
或者在 XML 布局中:
<se.fnord.android.layout.PredicateLayout
    android:id="@+id/predicate_layout"
    android:layout_width="fill_parent"
    android:layout_height="wrap_content"
/>
布局:
package se.fnord.android.layout;

import android.content.Context;
import android.util.AttributeSet;
import android.view.View;
import android.view.ViewGroup;

/**
 * ViewGroup that arranges child views in a similar way to text, with them laid
 * out one line at a time and "wrapping" to the next line as needed.
 *
 * Code licensed under CC-by-SA
 *
 * @author Henrik Gustafsson
 * @see http://stackoverflow.com/questions/549451/line-breaking-widget-layout-for-android
 * @license http://creativecommons.org/licenses/by-sa/2.5/
 *
 */
public class PredicateLayout extends ViewGroup {

    private int line_height;

    public PredicateLayout(Context context) {
        super(context);
    }

    public PredicateLayout(Context context, AttributeSet attrs){
        super(context, attrs);
    }

    @Override
    protected void onMeasure(int widthMeasureSpec, int heightMeasureSpec) {
        assert(MeasureSpec.getMode(widthMeasureSpec) != MeasureSpec.UNSPECIFIED);

        final int width = MeasureSpec.getSize(widthMeasureSpec);

        // The next line is WRONG!!! Doesn't take into account requested MeasureSpec mode!
        int height = MeasureSpec.getSize(heightMeasureSpec) - getPaddingTop() - getPaddingBottom();
        final int count = getChildCount();
        int line_height = 0;

        int xpos = getPaddingLeft();
        int ypos = getPaddingTop();

        for (int i = 0; i < count; i++) {
            final View child = getChildAt(i);
            if (child.getVisibility() != GONE) {
                final LayoutParams lp = (LayoutParams) child.getLayoutParams();
                child.measure(
                        MeasureSpec.makeMeasureSpec(width, MeasureSpec.AT_MOST),
                        MeasureSpec.makeMeasureSpec(height, MeasureSpec.UNSPECIFIED));

                final int childw = child.getMeasuredWidth();
                line_height = Math.max(line_height, child.getMeasuredHeight() + lp.height);

                if (xpos + childw > width) {
                    xpos = getPaddingLeft();
                    ypos += line_height;
                }

                xpos += childw + lp.width;
            }
        }
        this.line_height = line_height;

        if (MeasureSpec.getMode(heightMeasureSpec) == MeasureSpec.UNSPECIFIED){
            height = ypos + line_height;

        } else if (MeasureSpec.getMode(heightMeasureSpec) == MeasureSpec.AT_MOST){
            if (ypos + line_height < height){
                height = ypos + line_height;
            }
        }
        setMeasuredDimension(width, height);
    }

    @Override
    protected LayoutParams generateDefaultLayoutParams() {
        return new LayoutParams(1, 1); // default of 1px spacing
    }

    @Override
    protected boolean checkLayoutParams(LayoutParams p) {
        return (p instanceof LayoutParams);
    }

    @Override
    protected void onLayout(boolean changed, int l, int t, int r, int b) {
        final int count = getChildCount();
        final int width = r - l;
        int xpos = getPaddingLeft();
        int ypos = getPaddingTop();

        for (int i = 0; i < count; i++) {
            final View child = getChildAt(i);
            if (child.getVisibility() != GONE) {
                final int childw = child.getMeasuredWidth();
                final int childh = child.getMeasuredHeight();
                final LayoutParams lp = (LayoutParams) child.getLayoutParams();
                if (xpos + childw > width) {
                    xpos = getPaddingLeft();
                    ypos += line_height;
                }
                child.layout(xpos, ypos, xpos + childw, ypos + childh);
                xpos += childw + lp.width;
            }
        }
    }
}
结果如下:


